%20(4).png)
![[background image] image of cityscape background (for an architect firm)](https://cdn.prod.website-files.com/68961ade6feff9cbdffc080d/69384e066e0e9a310b6817f8_061f6bac-48bf-44b8-a689-078dacd8009f.avif)
TL;DR:
- A property viewing checklist helps buyers and investors conduct thorough evaluations before purchasing a home. It includes pre-viewing research, on-site inspections, and asking targeted questions, reducing the risk of costly mistakes. Proper preparation and disciplined evaluation improve the chances of making a sound investment.
A property viewing checklist is a systematic evaluation tool that guides homebuyers and investors through every critical assessment before committing to a purchase. Without one, buyers rely on memory and first impressions, both of which are unreliable. The home-buying process takes around 7 months, with roughly 2 months spent searching and attending viewings. That compressed timeline makes structured preparation non-negotiable. A solid checklist covers EPC ratings, structural red flags, utility conditions, and the right questions to ask agents, turning an emotional experience into a disciplined evaluation.
Pre-viewing research is the foundation of any serious real estate checklist. Buyers who skip this step walk into viewings blind, and 70% of buyers miss at least 3 critical checks such as EPC ratings, school catchment areas, or broadband speeds before attending a showing. Missing these checks does not just affect comfort. It affects resale value and long-term costs.

The Energy Performance Certificate (EPC) rating tells you how energy-efficient a property is, scored from A (best) to G (worst). Upgrading an EPC rating from F to C can cost between $5,000 and $12,000, and a poor rating reduces resale value by 5–10%. Request the EPC before you visit so you can factor those costs into your offer.
Research local crime statistics through publicly available databases before you visit. Confirm school catchment areas, especially if family needs or resale value to future family buyers matter to you. Check broadband speeds and available providers using tools like your national broadband checker, since remote work has made connectivity a deal-breaker for many buyers.
Satellite maps reveal roof conditions and possible unauthorized extensions that you cannot spot from street level. This takes five minutes and can surface planning violations or structural concerns before you invest time in a full viewing. Cross-reference what you see with the property’s listed floor plan.
Here is a pre-viewing research checklist to complete before every showing:
Pro Tip: Run a satellite map check on Google Maps or a local equivalent the night before your viewing. Zoom in on the roof for missing tiles, sagging ridgelines, or moss buildup. These are repair costs that rarely appear in listing photos.
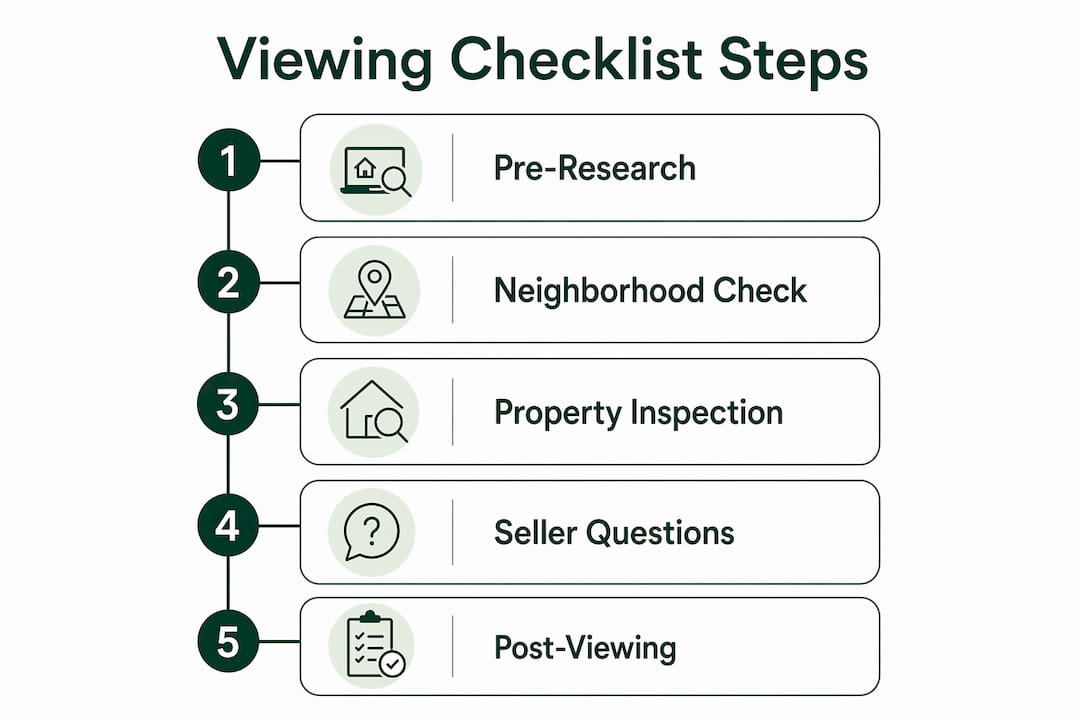
Buyers treat viewings like tours. Buyers should treat viewings like forensic assessments, focusing on red flags rather than surface aesthetics. A structured, room-by-room approach is the only way to catch what sellers and agents do not volunteer.
Work through the property in this order:
Hidden signs of damp such as bubbling paint and tide marks are early indicators of serious structural issues not obvious during a casual walk-through. Do not skip the less glamorous spaces.
Pro Tip: Bring a phone charger to test electrical outlets in every room. Plug it in and confirm it works. Dead outlets can indicate wiring faults or a tripped circuit that the seller has not disclosed.
Taking photos and videos during viewings, including under sinks and inside cupboards, preserves details for comparison and reduces memory bias when you review multiple properties later.
The right questions uncover what the listing does not show. Sellers are not required to volunteer problems, but direct questions create a record and often prompt honest answers. A thorough property inspection guide will tell you what to look for physically. These questions fill in the history.
Ask the following at every viewing:
Ownership structure deserves particular attention. Leasehold properties with fewer than 80 years remaining on the lease become significantly harder to mortgage and resell. Confirm the lease length and any planned service charge increases before you proceed.
The viewing is not the finish line. The decisions made after a viewing determine whether you buy well or buy badly. A structured post-viewing process protects you from surprises that surface after contracts are signed.
A second viewing at a different time of day is one of the most underused tools in a buyer’s checklist. A second viewing at different times helps assess natural light, noise levels, and neighborhood activity that first viewings may mask. Visit once in the morning and once in the evening if the property is a serious contender.
Schedule a professional home inspection before you finalize any offer. Professional home inspection costs typically range from $400 to $600. Sewer scope inspections run $200 to $300, and radon tests cost $150 to $250 as of early 2026. Inspection contingency periods typically last 7–14 days, giving you time to review findings and renegotiate or withdraw.
| Post-viewing step | Estimated cost | Timeline |
|---|---|---|
| Professional home inspection | $400–$600 | Within 7–14 days of offer |
| Sewer scope inspection | $200–$300 | Same period as home inspection |
| Radon test | $150–$250 | Same period as home inspection |
| Second viewing | No cost | Before submitting offer |
| Mortgage pre-approval confirmation | Varies by lender | Before offer submission |
Having mortgage pre-approval signals serious intent and helps buyers act quickly in competitive markets where properties can sell in as few as 66 days. Sellers favor pre-approved buyers because the transaction is less likely to fall through. Confirm your pre-approval is current before you make any offer.
Organize your notes and photos from each viewing in a shared folder or note-taking app. Label each property clearly and record your scores for structural condition, location, and value. This system removes emotion from the comparison process and makes the final decision much cleaner. For buyers working through the Israeli market, the homebuying checklist for 2026 covers market-specific steps worth reviewing alongside this general framework.
A property viewing checklist reduces costly mistakes by combining pre-viewing data research, structured on-site assessment, targeted seller questions, and disciplined post-viewing due diligence before any offer is made.
| Point | Details |
|---|---|
| Pre-viewing research matters | Check EPC ratings, crime data, schools, and broadband before attending any showing. |
| Treat viewings forensically | Focus on structural red flags like damp, cracks, and utility age rather than aesthetics. |
| Ask direct questions | Inquire about boiler age, ownership type, repairs, and time on market at every viewing. |
| Budget for inspections | Professional inspections cost $400–$600 and protect against expensive post-purchase surprises. |
| Get pre-approved first | Mortgage pre-approval strengthens your offer and speeds up the transaction in competitive markets. |
Buyers consistently underestimate how much preparation a viewing requires. I have seen buyers fall in love with a kitchen and completely miss a sagging roofline visible from the front path. Emotional attachment during viewing is one of the most common and costly buyer traps. Bringing a neutral third party helps maintain objective assessment because neutral observers spot issues that excited buyers overlook.
The buyers who negotiate the best deals are not the ones who love the property most. They are the ones who documented every flaw, asked every uncomfortable question, and walked in with a checklist rather than a wish list. A structured property viewing workflow turns a subjective experience into a repeatable process. That shift in mindset is what separates confident buyers from regretful ones.
My strongest advice: never attend a second viewing without a professional inspector lined up. By the time you are considering a second visit, you are emotionally invested. The inspector is not. Their report gives you negotiating power and, sometimes, a very good reason to walk away.
— Spiros
Yigal-realty works with homebuyers and investors at every stage of the property evaluation process, from pre-viewing research to post-inspection negotiation. The team specializes in residential properties in Beit Shemesh and surrounding areas, with deep knowledge of local market conditions, development timelines, and community-specific considerations. Yigal-realty provides personalized guidance on what to assess during viewings, how to read inspection reports, and how to structure offers in competitive conditions. Buyers also get early access to new projects and direct support from agents who understand the needs of observant and international buyers. Connect with the Yigal-realty team to get expert buying guidance tailored to your property search.
A property viewing checklist is a structured list of physical, legal, and financial checks that buyers complete before and during a property showing. It covers everything from EPC ratings and structural condition to seller questions and post-viewing inspections.
Most buyers benefit from at least two viewings at different times of day. A second visit reveals natural light levels, noise, and neighborhood activity that a single morning showing typically masks.
Damp signs such as bubbling paint, tide marks, and musty odors are the most serious red flags. Horizontal cracks in exterior walls, a boiler older than 10 years, and condensation between window panes also signal significant repair costs.
A professional home inspection costs $400–$600. Adding a sewer scope ($200–$300) and a radon test ($150–$250) gives you a thorough picture of the property’s condition for under $1,200 total.
Pre-approval confirms your budget and signals to sellers that you are a serious buyer. In markets where properties sell in as few as 66 days, pre-approved buyers move faster and win more competitive offers.